You know those mornings when you’re scrambling (pun totally intended) to get out the door but still need something hearty? That’s where my cheesy breakfast burritos swoop in like a superhero. I’ve lost count of how many rushed mornings they’ve saved—from forgotten lunchbox days to those “I hit snooze too many times” emergencies. They are the ultimate golden ticket for a stress-free start to your day.
Imagine melty cheese hugging fluffy eggs and a quick veggie crunch, all wrapped up in a warm, toasted tortilla. You can whip these up in 15 minutes flat, and trust me, they taste like a lazy Sunday morning even on the busiest Tuesday. Whether you are eating one-handed while chasing a toddler or prepping a batch for the week ahead, these burritos are a warm, edible hug that actually keeps you full.
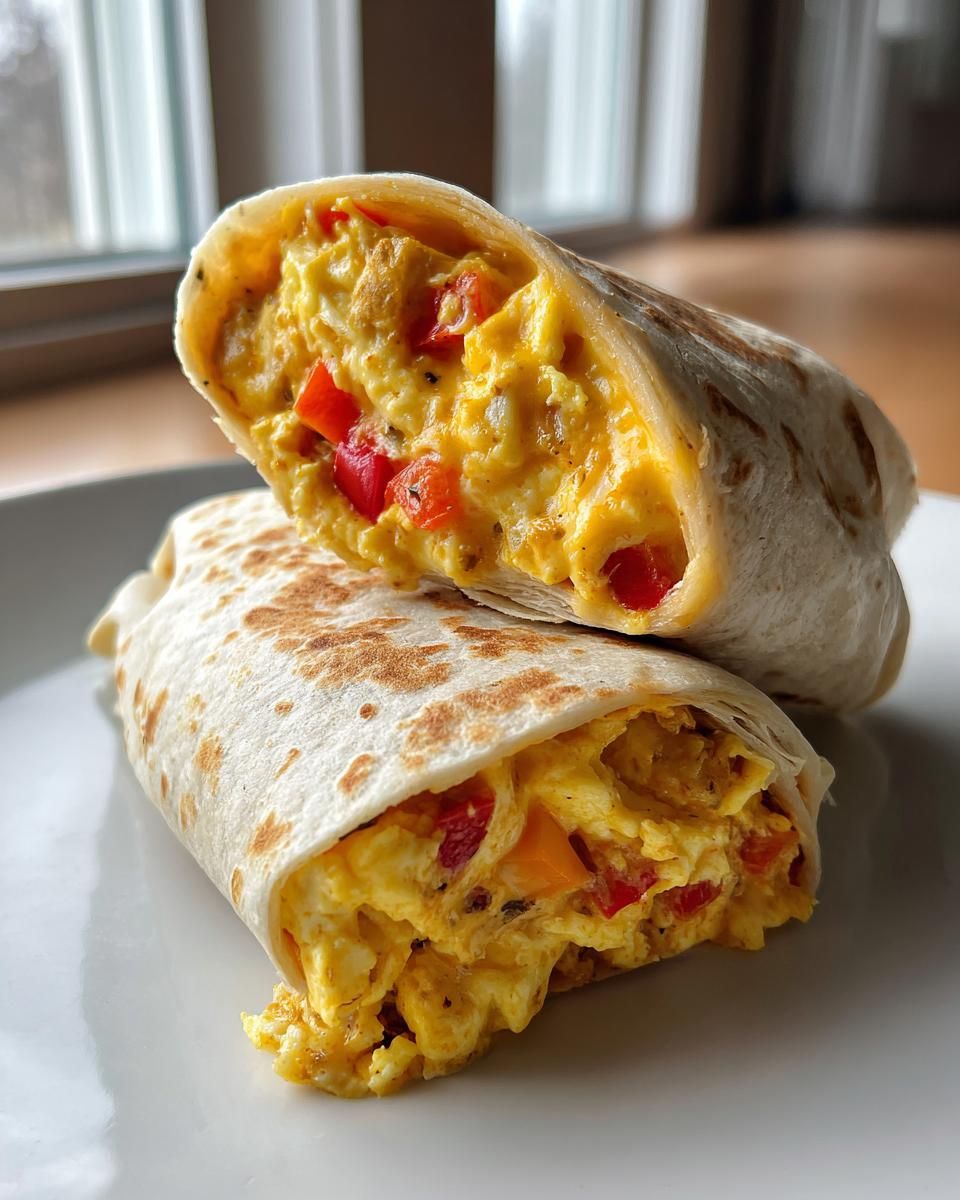
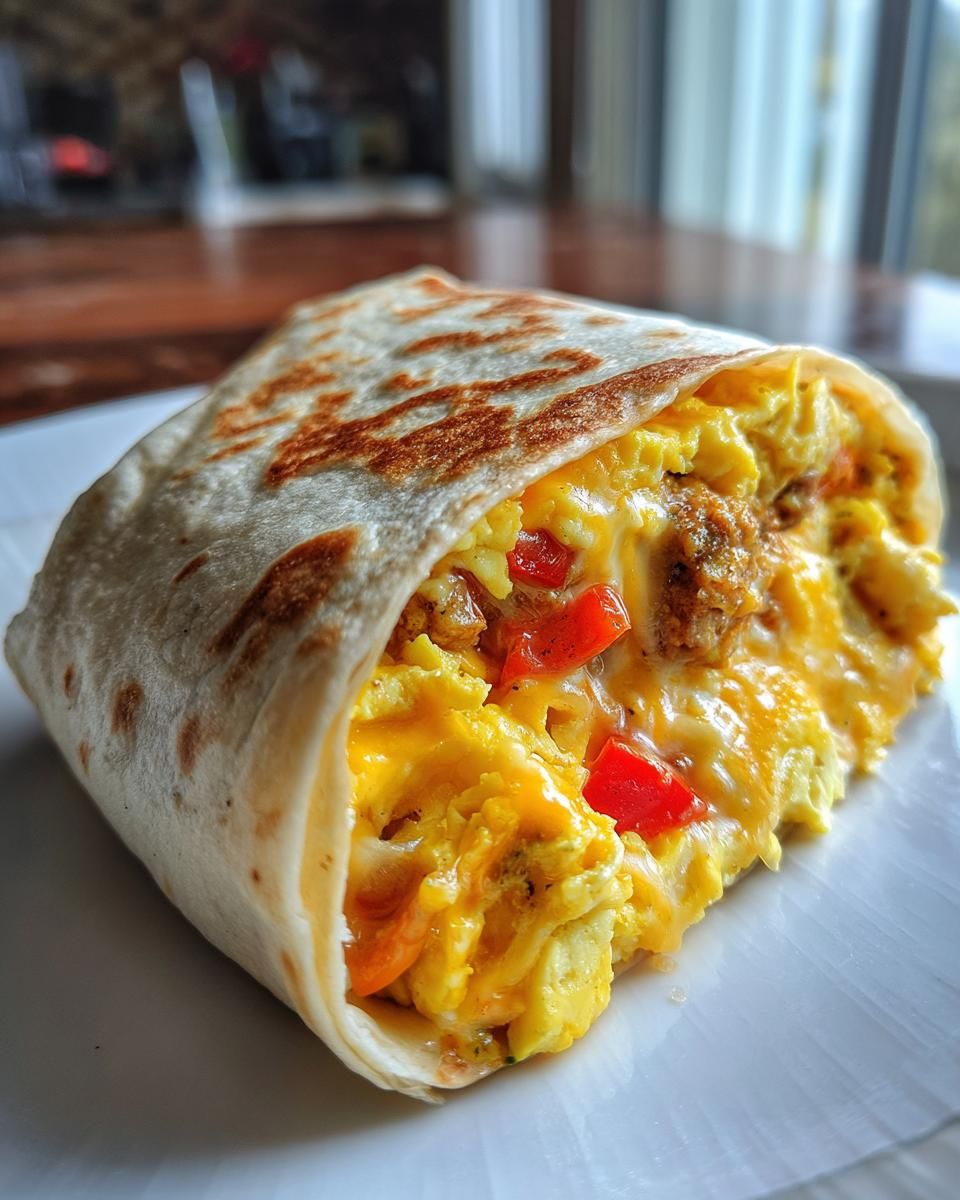
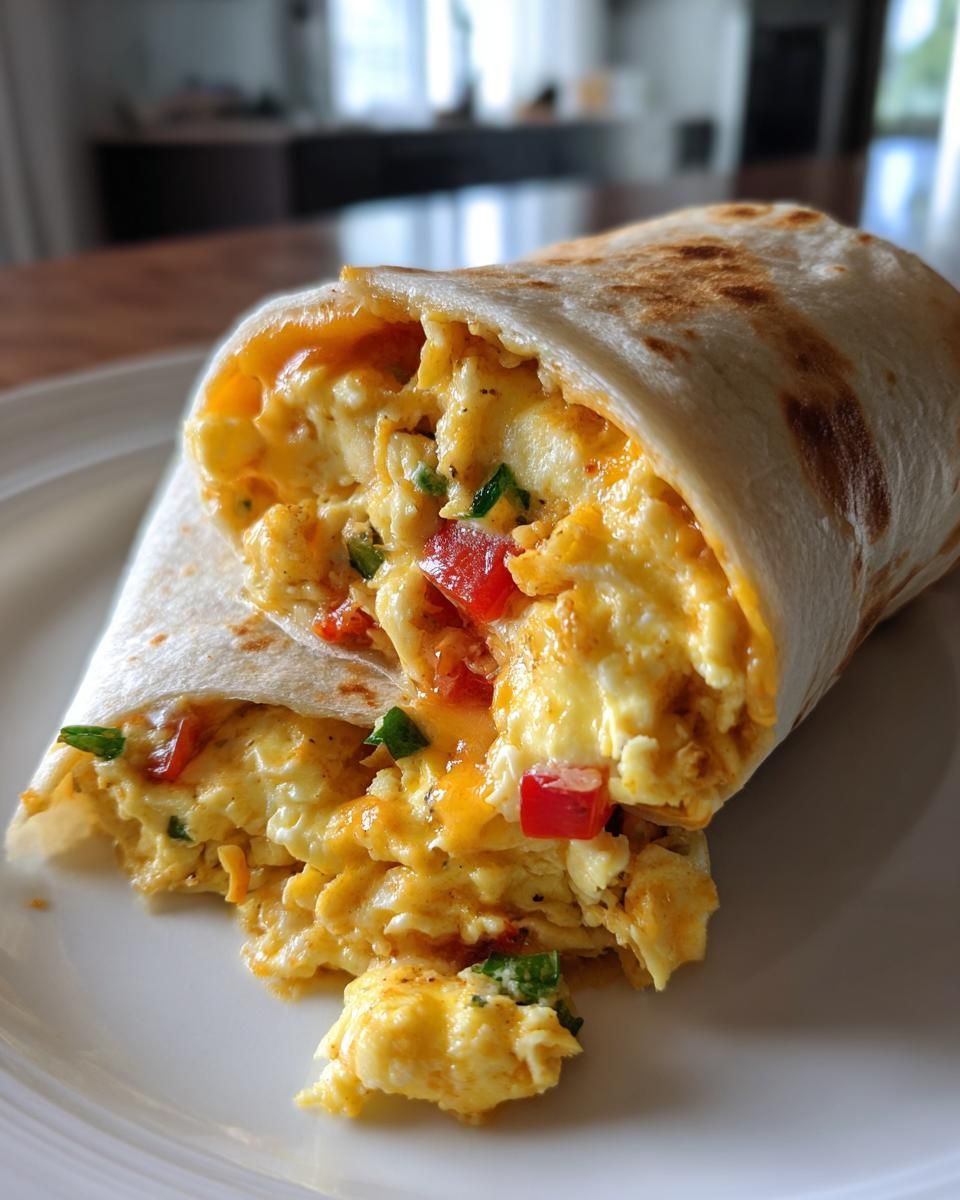
Quick Answer: To make these 15-minute cheesy breakfast burritos, sauté diced peppers and onions in butter, scramble two large eggs until fluffy, and roll them into a warm 10-inch flour tortilla with a generous 1/4 cup of shredded cheddar cheese. It’s a fast, customizable, and portable high-protein breakfast.

Why You’ll Love These Cheesy Breakfast Burritos
Listen, I’m not exaggerating when I say these burritos are life-changing. Here’s why they deserve a permanent spot in your breakfast rotation:
- Speed demon: From fridge to face in 15 minutes flat—faster than waiting in the drive-thru line.
- Endlessly customizable: Swap in jalapeños for spice, add bacon for crunch, or keep it veggie-forward.
- Perfect texture: That glorious cheese pull combined with pillowy eggs is pure breakfast magic.
- Meal prep superstar: Make a batch on Sunday, wrap them in foil, and reheat for an easy grab-and-go meal all week.
Essential Ingredients for the Ultimate Cheesy Burrito
Creating a breakfast masterpiece starts with the quality of your components. While these cheesy breakfast burritos are designed for speed, choosing the right ingredients ensures you don’t end up with a soggy or bland wrap. Here is exactly what you need to keep in your pantry and fridge:
- 2 Large Eggs: These provide the perfect protein base. Using large eggs ensures a consistent filling-to-tortilla ratio.
- 1/4 Cup Shredded Cheddar Cheese: For the best results, shred your own! Pre-shredded varieties often contain cellulose to prevent clumping, which can hinder that perfect melt.
- 1 Tbsp Real Butter: Avoid margarine. Real butter adds a nutty richness to the sautéed vegetables and the eggs.
- 1 Large Flour Tortilla (10-inch): Size matters here. Anything smaller than 10 inches makes it nearly impossible to tuck the sides properly.
- 2 Tbsp Diced Bell Peppers: Red or orange peppers offer a subtle sweetness, while green ones provide a sharper, savory bite.
- 2 Tbsp Diced Yellow Onions: These provide the aromatic foundation for your filling.
- Salt and Pepper: Essential for bringing out the natural flavors of the eggs.
- 1 Tbsp Chunky Salsa (Optional): Adds a hit of acidity and moisture.
Quick Ingredient Checklist
| Ingredient | Purpose | Pro Tip |
|---|---|---|
| Large Eggs | Structure & Protein | Whisk until no white streaks remain. |
| Cheddar Cheese | Flavor & Creaminess | Sharp cheddar provides the best “tang.” |
| Flour Tortilla | The Vessel | Warm it first to prevent cracking. |
| Bell Peppers | Crunch & Color | Dice them finely for even distribution. |
Step-by-Step Instructions: From Pan to Plate in 15 Minutes
Cooking under pressure doesn’t mean you have to sacrifice quality. Follow these steps to ensure your 15-minute breakfast is perfect every single time. Keep your coffee close and your spatula ready!
Step 1: Sautéing for Flavor
Heat your butter in a non-stick skillet over medium heat. Once it’s bubbling and slightly nutty, toss in your peppers and onions. The goal here is a quick sauté—about 2 minutes. You want the onions translucent and the peppers softened but still holding a slight “snap.” Season them immediately with a tiny pinch of salt to draw out moisture and intensify the flavor.
Step 2: The Perfect Scramble
Pour your well-beaten eggs directly over the vegetables. Using a silicone spatula, gently push the cooked edges toward the center. This creates those large, pillowy folds that make for a premium burrito texture. Crucial Tip: Remove the pan from the heat when the eggs look 90% cooked. The residual heat will finish the job without turning the eggs into rubber.
Step 3: Mastering the Roll
While the eggs rest for 30 seconds, warm your tortilla. Place the egg mixture just below the center line of the tortilla and sprinkle the cheese on top immediately so it begins to fuse the filling together. Fold the bottom up, tuck the sides in tightly like a small sleeping bag, and roll forward. If you want a crispy exterior, place the rolled burrito seam-side down in the hot pan for an extra 30 seconds.
Expert Tips for Burrito Success
I’ve burned more tortillas than I’d like to admit, and these “commandments” are born from those failures. If you want a restaurant-quality result at home, keep these tips in mind:
The Pan Matters
Don’t use a stainless steel pan unless you are a master of temperature control. A high-quality non-stick skillet or a well-seasoned cast iron pan is the only way to go for eggs. It ensures you don’t leave half your breakfast stuck to the bottom of the pan.
Fold Like a Professional
The most common mistake is overfilling. It is tempting to pack in extra cheese, but if you can’t get at least an inch of “clearance” on the sides of the tortilla, your burrito will burst. Think of it as “swaddling” the filling—keep it snug but not strained.
Pro Tip: Place a small amount of cheese directly on the tortilla before adding the hot eggs. This creates a “glue” that helps the burrito stay together during the first few bites.
Creative Variations to Try
Once you’ve mastered the basic recipe, you can treat these burritos as a blank canvas. Depending on your mood or dietary needs, here are a few tested variations:
Protein Boosters
- Crispy Bacon: Cook two strips of bacon first, crumble them, and use a teaspoon of the bacon fat instead of butter to cook your eggs.
- Black Beans: Rinse and drain canned black beans for a vegetarian-friendly fiber boost.
- Leftover Ham: Diced holiday ham adds a great salty element that pairs perfectly with Swiss or Cheddar cheese.
Vegetable Swaps
- Fresh Spinach: Add a handful of spinach right before the eggs finish cooking; it will wilt in seconds.
- Sautéed Mushrooms: Use cremini or button mushrooms for an earthy, umami flavor.
- Poblano Peppers: If you want more depth of flavor without intense heat, swap the bell peppers for roasted poblanos.
Dietary Hacks
| Need | Substitution | Benefit |
|---|---|---|
| Low-Carb | Egg Wraps or Lettuce | Reduces carb count by 80%. |
| Dairy-Free | Avocado or Vegan Chao | Maintains creaminess without the lactose. |
| Gluten-Free | Corn or Almond Flour Tortilla | Safe for Celiac or GF diets. |
Storage, Reheating, and Meal Prep
Can you make these ahead of time? Yes! But you have to be smart about it. If you are meal prepping for the week, follow these specific guidelines to avoid the dreaded “soggy tortilla” syndrome.
Fridge and Freezer Rules
If storing in the fridge, let the filling cool slightly before rolling to prevent steam from softening the tortilla. Wrap tightly in foil and store for up to 48 hours. For freezing, I recommend wrapping the burrito in parchment paper first, then a layer of heavy-duty foil. This prevents freezer burn and makes reheating much easier.
How to Reheat Properly
- The Oven Method: Keep the foil on and bake at 350°F for 10-12 minutes. This is the best way to maintain the original texture.
- The Skillet Method: If you have 5 minutes, reheat the burrito in a dry pan over medium heat, rotating every minute. This crisps the outside while melting the inside.
- The Microwave Method: Remove foil. Wrap in a damp paper towel and nuke for 45-60 seconds. The damp towel creates steam that keeps the tortilla from becoming a rubber band.

Serving Suggestions for a Full Breakfast
While these burritos are a complete meal in a wrap, sometimes you want to dress them up for a weekend brunch. Here is how to take it to the next level:
- The Sauce Bar: Offer a variety of hot sauces, from smoky chipotle to tangy salsa verde.
- Avocado Slices: Fresh avocado adds healthy fats and a cooling contrast to the warm eggs.
- Side of Fruit: Balance the savory, salty burrito with a side of fresh berries or sliced melon.
- The Coffee Pairing: A medium-roast Colombian coffee has the right acidity to cut through the richness of the cheddar cheese.
A Final Thought: Don’t be afraid to experiment! The “perfect” burrito is the one that gets you out the door feeling satisfied. Whether you add extra spice or keep it classic, these 15-minute wraps are designed to make your life easier.
Essential Ingredients for the Ultimate Cheesy Burrito
Creating a breakfast masterpiece starts with the quality of your components. While these cheesy breakfast burritos are designed for speed, choosing the right ingredients ensures you don’t end up with a soggy or bland wrap. Here is exactly what you need to keep in your pantry and fridge:
- 2 Large Eggs: These provide the perfect protein base. Using large eggs ensures a consistent filling-to-tortilla ratio.
- 1/4 Cup Shredded Cheddar Cheese: For the best results, shred your own! Pre-shredded varieties often contain cellulose to prevent clumping, which can hinder that perfect melt.
- 1 Tbsp Real Butter: Avoid margarine. Real butter adds a nutty richness to the sautéed vegetables and the eggs.
- 1 Large Flour Tortilla (10-inch): Size matters here. Anything smaller than 10 inches makes it nearly impossible to tuck the sides properly.
- 2 Tbsp Diced Bell Peppers: Red or orange peppers offer a subtle sweetness, while green ones provide a sharper, savory bite.
- 2 Tbsp Diced Yellow Onions: These provide the aromatic foundation for your filling.
- Salt and Pepper: Essential for bringing out the natural flavors of the eggs.
- 1 Tbsp Chunky Salsa (Optional): Adds a hit of acidity and moisture.
Quick Ingredient Checklist
| Ingredient | Purpose | Pro Tip |
|---|---|---|
| Large Eggs | Structure & Protein | Whisk until no white streaks remain. |
| Cheddar Cheese | Flavor & Creaminess | Sharp cheddar provides the best “tang.” |
| Flour Tortilla | The Vessel | Warm it first to prevent cracking. |
| Bell Peppers | Crunch & Color | Dice them finely for even distribution. |
Step-by-Step Instructions: From Pan to Plate in 15 Minutes
Cooking under pressure doesn’t mean you have to sacrifice quality. Follow these steps to ensure your 15-minute breakfast is perfect every single time. Keep your coffee close and your spatula ready!
Step 1: Sautéing for Flavor
Heat your butter in a non-stick skillet over medium heat. Once it’s bubbling and slightly nutty, toss in your peppers and onions. The goal here is a quick sauté—about 2 minutes. You want the onions translucent and the peppers softened but still holding a slight “snap.” Season them immediately with a tiny pinch of salt to draw out moisture and intensify the flavor.
Step 2: The Perfect Scramble
Pour your well-beaten eggs directly over the vegetables. Using a silicone spatula, gently push the cooked edges toward the center. This creates those large, pillowy folds that make for a premium burrito texture. Crucial Tip: Remove the pan from the heat when the eggs look 90% cooked. The residual heat will finish the job without turning the eggs into rubber.
Step 3: Mastering the Roll
While the eggs rest for 30 seconds, warm your tortilla. Place the egg mixture just below the center line of the tortilla and sprinkle the cheese on top immediately so it begins to fuse the filling together. Fold the bottom up, tuck the sides in tightly like a small sleeping bag, and roll forward. If you want a crispy exterior, place the rolled burrito seam-side down in the hot pan for an extra 30 seconds.

Expert Tips for Burrito Success
I’ve burned more tortillas than I’d like to admit, and these “commandments” are born from those failures. If you want a restaurant-quality result at home, keep these tips in mind:
The Pan Matters
Don’t use a stainless steel pan unless you are a master of temperature control. A high-quality non-stick skillet or a well-seasoned cast iron pan is the only way to go for eggs. It ensures you don’t leave half your breakfast stuck to the bottom of the pan.
Fold Like a Professional
The most common mistake is overfilling. It is tempting to pack in extra cheese, but if you can’t get at least an inch of “clearance” on the sides of the tortilla, your burrito will burst. Think of it as “swaddling” the filling—keep it snug but not strained.
Pro Tip: Place a small amount of cheese directly on the tortilla before adding the hot eggs. This creates a “glue” that helps the burrito stay together during the first few bites.
Creative Variations to Try
Once you’ve mastered the basic recipe, you can treat these burritos as a blank canvas. Depending on your mood or dietary needs, here are a few tested variations:
Protein Boosters
- Crispy Bacon: Cook two strips of bacon first, crumble them, and use a teaspoon of the bacon fat instead of butter to cook your eggs.
- Black Beans: Rinse and drain canned black beans for a vegetarian-friendly fiber boost.
- Leftover Ham: Diced holiday ham adds a great salty element that pairs perfectly with Swiss or Cheddar cheese.
Vegetable Swaps
- Fresh Spinach: Add a handful of spinach right before the eggs finish cooking; it will wilt in seconds.
- Sautéed Mushrooms: Use cremini or button mushrooms for an earthy, umami flavor.
- Poblano Peppers: If you want more depth of flavor without intense heat, swap the bell peppers for roasted poblanos.
Dietary Hacks
| Need | Substitution | Benefit |
|---|---|---|
| Low-Carb | Egg Wraps or Lettuce | Reduces carb count by 80%. |
| Dairy-Free | Avocado or Vegan Chao | Maintains creaminess without the lactose. |
| Gluten-Free | Corn or Almond Flour Tortilla | Safe for Celiac or GF diets. |

Storage, Reheating, and Meal Prep
Can you make these ahead of time? Yes! But you have to be smart about it. If you are meal prepping for the week, follow these specific guidelines to avoid the dreaded “soggy tortilla” syndrome.
Fridge and Freezer Rules
If storing in the fridge, let the filling cool slightly before rolling to prevent steam from softening the tortilla. Wrap tightly in foil and store for up to 48 hours. For freezing, I recommend wrapping the burrito in parchment paper first, then a layer of heavy-duty foil. This prevents freezer burn and makes reheating much easier.
How to Reheat Properly
- The Oven Method: Keep the foil on and bake at 350°F for 10-12 minutes. This is the best way to maintain the original texture.
- The Skillet Method: If you have 5 minutes, reheat the burrito in a dry pan over medium heat, rotating every minute. This crisps the outside while melting the inside.
- The Microwave Method: Remove foil. Wrap in a damp paper towel and nuke for 45-60 seconds. The damp towel creates steam that keeps the tortilla from becoming a rubber band.
Serving Suggestions for a Full Breakfast
While these burritos are a complete meal in a wrap, sometimes you want to dress them up for a weekend brunch. Here is how to take it to the next level:
- The Sauce Bar: Offer a variety of hot sauces, from smoky chipotle to tangy salsa verde.
- Avocado Slices: Fresh avocado adds healthy fats and a cooling contrast to the warm eggs.
- Side of Fruit: Balance the savory, salty burrito with a side of fresh berries or sliced melon.
- The Coffee Pairing: A medium-roast Colombian coffee has the right acidity to cut through the richness of the cheddar cheese.
A Final Thought: Don’t be afraid to experiment! The “perfect” burrito is the one that gets you out the door feeling satisfied. Whether you add extra spice or keep it classic, these 15-minute wraps are designed to make your life easier.