You’ve had one of those days—long meetings, endless errands, and somehow, your stomach’s growling louder than your to-do list. All you want is a warm, satisfying dinner without spending your whole evening cooking or cleaning. That’s where this easy honey garlic chicken breast recipe saves the day.
In just 20 minutes, you’ll turn a few pantry staples and a couple of chicken breasts into a mouthwatering meal that hits all the right notes—sweet, savory, garlicky, and golden-seared to perfection. Whether you’re cooking for yourself, your family, or prepping meals ahead, this recipe will quickly become a favorite in your rotation. Let’s break down everything you need to know to master this dish from start to finish.
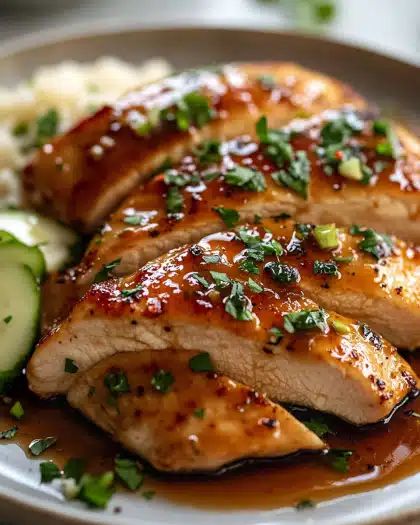
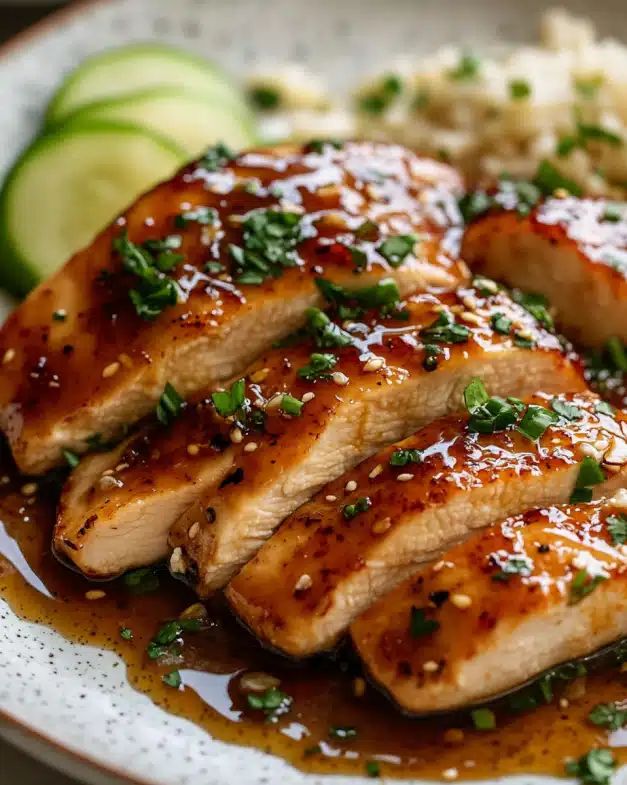
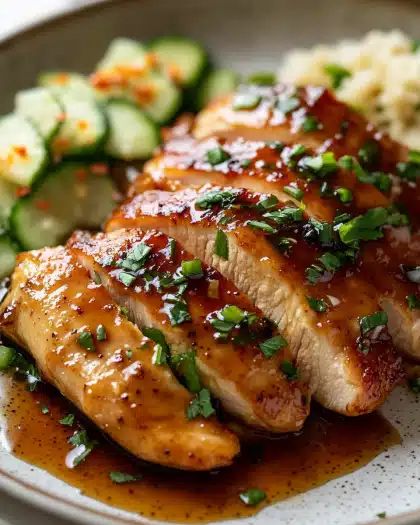
Quick Answer: This recipe uses thinly sliced chicken fillets dredged in flour and seared until golden, then tossed in a 5-ingredient glaze made of honey, garlic, soy sauce, apple cider vinegar, and butter. It takes only 20 minutes and delivers a restaurant-quality sticky glaze perfect for serving over rice or vegetables.

There is no need for fancy tools or hard-to-find ingredients here. By using fresh garlic and high-quality honey, you create a depth of flavor that tastes like you spent hours in the kitchen, rather than just twenty minutes. It’s the ultimate “cheat code” for a gourmet-style dinner on a hectic Tuesday night.
Why You’ll Love This Easy Honey Garlic Chicken Breast
When it comes to weeknight dinners, we all want the same thing: maximum flavor with minimum effort. This Easy Honey Garlic Chicken Breast recipe is a absolute game-changer for anyone juggling a busy schedule. In just 20 minutes, you can transform humble chicken breasts into a dish that rivals your favorite takeout spot. It’s the perfect balance of sweet, savory, and garlicky goodness that appeals to both picky eaters and gourmet fans alike.
Beyond the incredible taste, this recipe is a favorite because it relies on pantry staples. You likely already have honey, soy sauce, and garlic in your kitchen right now. By mastering the simple technique of searing thin fillets and reducing a quick pan sauce, you gain a versatile skill that can be applied to many other proteins. Whether you are cooking for a family of four or looking for a reliable meal prep option, this chicken stays juicy and flavorful even after reheating.

Top Reasons to Make This Your Go-To Chicken Dinner
- Fast and foolproof: You move from the cutting board to the dinner table in roughly 20 minutes.
- Bold flavor with basic ingredients: No specialized equipment or expensive spices required.
- Flexible and family-friendly: The sticky, sweet glaze is a hit with kids, while the garlic and vinegar provide depth for adults.
- Perfect for meal prep: The sauce acts as a natural preservative, keeping the meat moist for up to four days in the fridge.
Ingredients You’ll Need (with Substitutions & Tips)
To achieve that signature sticky glaze and tender meat, the quality and preparation of your ingredients matter. We recommend using fresh garlic over the jarred variety for a sharper, more authentic bite. Additionally, using a light soy sauce ensures the dish isn’t overly salty, allowing the floral sweetness of the honey to shine through. If you’re looking for a healthier twist, you can easily swap the butter for olive oil or avocado oil.
| Ingredient | Amount | Notes & Substitutions |
|---|---|---|
| Boneless, skinless chicken breasts | 1 lb (about 2 pieces) | Slice into 4 thin fillets or use chicken tenders for even faster cooking. |
| Salt and black pepper | To taste | Use kosher salt for better coverage. |
| All-purpose flour | 1/4 cup | Use cornstarch or gluten-free flour for a crispier, GF-friendly crust. |
| Unsalted butter | 3 1/2 tbsp | Divided. Olive oil works as a heart-healthy alternative. |
| Garlic, minced | 2 cloves | Freshly minced provides the best aromatic profile. |
| Apple cider vinegar | 1 1/2 tbsp | Substitute with rice vinegar or white wine vinegar if needed. |
| Soy sauce | 1 tbsp | Use Tamari or Coconut Aminos for a gluten-free version. |
| Honey | 1/3 cup | Use clover or wildflower honey. Maple syrup is a great vegan-friendly swap. |
Pro Ingredient Tips for Success
Success starts with the chicken. Most chicken breasts in modern grocery stores are quite large and uneven. By slicing them horizontally into thinner cutlets, you increase the surface area for that delicious golden-brown sear and ensure the meat cooks through before the garlic has a chance to burn. If your chicken pieces are still uneven in thickness, use a meat mallet to pound them to a uniform 1/2-inch thickness.
How to Make Honey Garlic Chicken Breast – Step-by-Step
The magic of this dish happens in a single skillet. The goal is to build layers of flavor: first by seasoning and searing the meat, then by deglazing the pan to create a rich, caramelized sauce that coats every inch of the chicken.
Step 1 – Slice and Season
Lay your chicken breasts flat on a cutting board. Placing one hand firmly on top of the breast, carefully slice through the middle horizontally to create two even fillets. Season both sides generously with salt and pepper. This foundational seasoning is crucial because the flour coating will lock these flavors into the meat.
Step 2 – Lightly Dredge in Flour
Place your flour in a wide, shallow bowl. Press each seasoned fillet into the flour, ensuring full coverage, then shake off the excess. You only want a very thin, translucent coating. This layer of starch is what creates the “crust” that the honey garlic sauce will eventually cling to, preventing the sauce from simply sliding off the meat.
Step 3 – Sear to Golden Perfection
Set a large skillet over high heat and add 3 tablespoons of the butter. Once the butter is bubbling and slightly browned, add the chicken. Don’t crowd the pan—if your skillet is small, cook in two batches. Sear for 2–3 minutes without moving the chicken until a deep golden crust forms. Flip and cook the other side for just 1 minute. The chicken doesn’t need to be 100% cooked through yet, as it will finish in the sauce.
Step 4 – Add Garlic and Build the Sauce
Turn the heat down to medium-high. Move the chicken to the sides of the pan and add the remaining 1/2 tablespoon of butter to the center. Toss in your minced garlic. Sauté for only 30 seconds until you can smell the aroma—be careful not to let it turn dark brown or bitter. Pour in the vinegar, soy sauce, and honey. Use a wooden spoon to scrape up any browned bits from the bottom of the pan; those bits are pure flavor!
Step 5 – Coat and Serve
Let the sauce come to a rapid simmer. As the water in the vinegar and soy sauce evaporates, the honey will begin to caramelize and thicken. Flip the chicken fillets several times to ensure they are fully submerged in the bubbling glaze. Once the sauce has thickened to a syrupy consistency (usually about 1–2 minutes), remove from heat immediately. Drizzle the extra pan sauce over the chicken before serving.
Serving Suggestions and Meal Pairings
Because the honey garlic glaze is quite rich and flavorful, it pairs best with sides that can soak up the extra sauce or provide a fresh, crisp contrast. Here are a few ways to turn this protein into a complete, balanced meal:
Perfect Pairings to Make It a Meal
- Grains: A bed of fluffy Jasmine rice or Basmati rice is the classic choice. For a low-carb option, try cauliflower rice or quinoa.
- Vegetables: Steamed broccoli, snap peas, or roasted asparagus provide a vibrant green contrast to the golden chicken.
- Noodles: Toss some quick-cooking ramen noodles or spaghetti in the leftover pan sauce with a dash of sesame oil and sliced scallions.
- Crunchy Salad: A simple slaw made with shredded cabbage, carrots, and a light ginger-soy dressing balances the sweetness of the honey.
Make It Work for Meal Prep
This recipe is a “holy grail” for meal preppers. To store, simply divide your cooked chicken and chosen sides into airtight containers. Tip: If you find the sauce thickens too much in the fridge, add a teaspoon of water before microwaving to loosen the glaze back to its original silky texture. The chicken will stay fresh and delicious for up to 4 days.
Tips for the Best Honey Garlic Chicken Every Time
Even a simple recipe has its secrets. To ensure your chicken is restaurant-quality every time you make it, keep these expert tips in mind:
- Heat Control: If the honey starts to smell like it’s burning or turning too dark, pull the pan off the heat immediately and add a tablespoon of water or chicken broth to stop the cooking process.
- The Pan Matters: A cast iron or stainless steel skillet will give you a better sear (and those tasty browned bits) than a non-stick pan.
- Freshness Counts: Avoid using the garlic that comes pre-minced in a jar. The preservative liquid in those jars can give the sauce a metallic aftertaste.
- Spice it Up: If you enjoy a little kick, add a half-teaspoon of red pepper flakes or a squeeze of Sriracha to the sauce while it simmers.
Nutrition Facts (Per Serving)
This dish provides a high-protein punch that keeps you full, though the honey does contribute to the carbohydrate count. Below is a breakdown of the approximate nutritional value per serving (based on 4 servings).
| Nutrient | Amount |
|---|---|
| Calories | ~380 kcal |
| Protein | 32g |
| Carbohydrates | 24g |
| Fat | 18g |
| Sugar | 16g |
| Sodium | ~450mg |
*Nutritional values are estimates based on standard ingredients. Adjustments to butter, honey, or chicken size will change these figures.

Frequently Asked Questions (FAQ)
How do I keep the chicken breast from getting tough?
The secret is the combination of thin slicing and high heat. By cooking thin fillets quickly, the outside sears and the inside stays juicy. Overcooking is the number one cause of “rubbery” chicken, so use a meat thermometer if you’re unsure—chicken is done at an internal temperature of 165°F (74°C).
Can I use chicken thighs instead of breasts?
Absolutely! Boneless, skinless chicken thighs are actually more forgiving because they have a higher fat content. They will take slightly longer to cook (about 4–5 minutes per side), but they result in an even richer flavor.
Is this recipe healthy?
Compared to deep-fried honey garlic chicken found in malls or takeout boxes, this version is significantly healthier. It uses minimal flour and is pan-seared rather than deep-fried. To make it even lighter, reduce the honey by half and use olive oil instead of butter.
Why You’ll Love This Easy Honey Garlic Chicken Breast
When it comes to weeknight dinners, we all want the same thing: maximum flavor with minimum effort. This Easy Honey Garlic Chicken Breast recipe is a absolute game-changer for anyone juggling a busy schedule. In just 20 minutes, you can transform humble chicken breasts into a dish that rivals your favorite takeout spot. It’s the perfect balance of sweet, savory, and garlicky goodness that appeals to both picky eaters and gourmet fans alike.
Beyond the incredible taste, this recipe is a favorite because it relies on pantry staples. You likely already have honey, soy sauce, and garlic in your kitchen right now. By mastering the simple technique of searing thin fillets and reducing a quick pan sauce, you gain a versatile skill that can be applied to many other proteins. Whether you are cooking for a family of four or looking for a reliable meal prep option, this chicken stays juicy and flavorful even after reheating.
Top Reasons to Make This Your Go-To Chicken Dinner
- Fast and foolproof: You move from the cutting board to the dinner table in roughly 20 minutes.
- Bold flavor with basic ingredients: No specialized equipment or expensive spices required.
- Flexible and family-friendly: The sticky, sweet glaze is a hit with kids, while the garlic and vinegar provide depth for adults.
- Perfect for meal prep: The sauce acts as a natural preservative, keeping the meat moist for up to four days in the fridge.
Ingredients You’ll Need (with Substitutions & Tips)
To achieve that signature sticky glaze and tender meat, the quality and preparation of your ingredients matter. We recommend using fresh garlic over the jarred variety for a sharper, more authentic bite. Additionally, using a light soy sauce ensures the dish isn’t overly salty, allowing the floral sweetness of the honey to shine through. If you’re looking for a healthier twist, you can easily swap the butter for olive oil or avocado oil.
| Ingredient | Amount | Notes & Substitutions |
|---|---|---|
| Boneless, skinless chicken breasts | 1 lb (about 2 pieces) | Slice into 4 thin fillets or use chicken tenders for even faster cooking. |
| Salt and black pepper | To taste | Use kosher salt for better coverage. |
| All-purpose flour | 1/4 cup | Use cornstarch or gluten-free flour for a crispier, GF-friendly crust. |
| Unsalted butter | 3 1/2 tbsp | Divided. Olive oil works as a heart-healthy alternative. |
| Garlic, minced | 2 cloves | Freshly minced provides the best aromatic profile. |
| Apple cider vinegar | 1 1/2 tbsp | Substitute with rice vinegar or white wine vinegar if needed. |
| Soy sauce | 1 tbsp | Use Tamari or Coconut Aminos for a gluten-free version. |
| Honey | 1/3 cup | Use clover or wildflower honey. Maple syrup is a great vegan-friendly swap. |
Pro Ingredient Tips for Success
Success starts with the chicken. Most chicken breasts in modern grocery stores are quite large and uneven. By slicing them horizontally into thinner cutlets, you increase the surface area for that delicious golden-brown sear and ensure the meat cooks through before the garlic has a chance to burn. If your chicken pieces are still uneven in thickness, use a meat mallet to pound them to a uniform 1/2-inch thickness.

How to Make Honey Garlic Chicken Breast – Step-by-Step
The magic of this dish happens in a single skillet. The goal is to build layers of flavor: first by seasoning and searing the meat, then by deglazing the pan to create a rich, caramelized sauce that coats every inch of the chicken.
Step 1 – Slice and Season
Lay your chicken breasts flat on a cutting board. Placing one hand firmly on top of the breast, carefully slice through the middle horizontally to create two even fillets. Season both sides generously with salt and pepper. This foundational seasoning is crucial because the flour coating will lock these flavors into the meat.
Step 2 – Lightly Dredge in Flour
Place your flour in a wide, shallow bowl. Press each seasoned fillet into the flour, ensuring full coverage, then shake off the excess. You only want a very thin, translucent coating. This layer of starch is what creates the “crust” that the honey garlic sauce will eventually cling to, preventing the sauce from simply sliding off the meat.
Step 3 – Sear to Golden Perfection
Set a large skillet over high heat and add 3 tablespoons of the butter. Once the butter is bubbling and slightly browned, add the chicken. Don’t crowd the pan—if your skillet is small, cook in two batches. Sear for 2–3 minutes without moving the chicken until a deep golden crust forms. Flip and cook the other side for just 1 minute. The chicken doesn’t need to be 100% cooked through yet, as it will finish in the sauce.
Step 4 – Add Garlic and Build the Sauce
Turn the heat down to medium-high. Move the chicken to the sides of the pan and add the remaining 1/2 tablespoon of butter to the center. Toss in your minced garlic. Sauté for only 30 seconds until you can smell the aroma—be careful not to let it turn dark brown or bitter. Pour in the vinegar, soy sauce, and honey. Use a wooden spoon to scrape up any browned bits from the bottom of the pan; those bits are pure flavor!
Step 5 – Coat and Serve
Let the sauce come to a rapid simmer. As the water in the vinegar and soy sauce evaporates, the honey will begin to caramelize and thicken. Flip the chicken fillets several times to ensure they are fully submerged in the bubbling glaze. Once the sauce has thickened to a syrupy consistency (usually about 1–2 minutes), remove from heat immediately. Drizzle the extra pan sauce over the chicken before serving.

Serving Suggestions and Meal Pairings
Because the honey garlic glaze is quite rich and flavorful, it pairs best with sides that can soak up the extra sauce or provide a fresh, crisp contrast. Here are a few ways to turn this protein into a complete, balanced meal:
Perfect Pairings to Make It a Meal
- Grains: A bed of fluffy Jasmine rice or Basmati rice is the classic choice. For a low-carb option, try cauliflower rice or quinoa.
- Vegetables: Steamed broccoli, snap peas, or roasted asparagus provide a vibrant green contrast to the golden chicken.
- Noodles: Toss some quick-cooking ramen noodles or spaghetti in the leftover pan sauce with a dash of sesame oil and sliced scallions.
- Crunchy Salad: A simple slaw made with shredded cabbage, carrots, and a light ginger-soy dressing balances the sweetness of the honey.
Make It Work for Meal Prep
This recipe is a “holy grail” for meal preppers. To store, simply divide your cooked chicken and chosen sides into airtight containers. Tip: If you find the sauce thickens too much in the fridge, add a teaspoon of water before microwaving to loosen the glaze back to its original silky texture. The chicken will stay fresh and delicious for up to 4 days.
Tips for the Best Honey Garlic Chicken Every Time
Even a simple recipe has its secrets. To ensure your chicken is restaurant-quality every time you make it, keep these expert tips in mind:
- Heat Control: If the honey starts to smell like it’s burning or turning too dark, pull the pan off the heat immediately and add a tablespoon of water or chicken broth to stop the cooking process.
- The Pan Matters: A cast iron or stainless steel skillet will give you a better sear (and those tasty browned bits) than a non-stick pan.
- Freshness Counts: Avoid using the garlic that comes pre-minced in a jar. The preservative liquid in those jars can give the sauce a metallic aftertaste.
- Spice it Up: If you enjoy a little kick, add a half-teaspoon of red pepper flakes or a squeeze of Sriracha to the sauce while it simmers.
Nutrition Facts (Per Serving)
This dish provides a high-protein punch that keeps you full, though the honey does contribute to the carbohydrate count. Below is a breakdown of the approximate nutritional value per serving (based on 4 servings).
| Nutrient | Amount |
|---|---|
| Calories | ~380 kcal |
| Protein | 32g |
| Carbohydrates | 24g |
| Fat | 18g |
| Sugar | 16g |
| Sodium | ~450mg |
*Nutritional values are estimates based on standard ingredients. Adjustments to butter, honey, or chicken size will change these figures.

Frequently Asked Questions (FAQ)
How do I keep the chicken breast from getting tough?
The secret is the combination of thin slicing and high heat. By cooking thin fillets quickly, the outside sears and the inside stays juicy. Overcooking is the number one cause of “rubbery” chicken, so use a meat thermometer if you’re unsure—chicken is done at an internal temperature of 165°F (74°C).
Can I use chicken thighs instead of breasts?
Absolutely! Boneless, skinless chicken thighs are actually more forgiving because they have a higher fat content. They will take slightly longer to cook (about 4–5 minutes per side), but they result in an even richer flavor.
Is this recipe healthy?
Compared to deep-fried honey garlic chicken found in malls or takeout boxes, this version is significantly healthier. It uses minimal flour and is pan-seared rather than deep-fried. To make it even lighter, reduce the honey by half and use olive oil instead of butter.