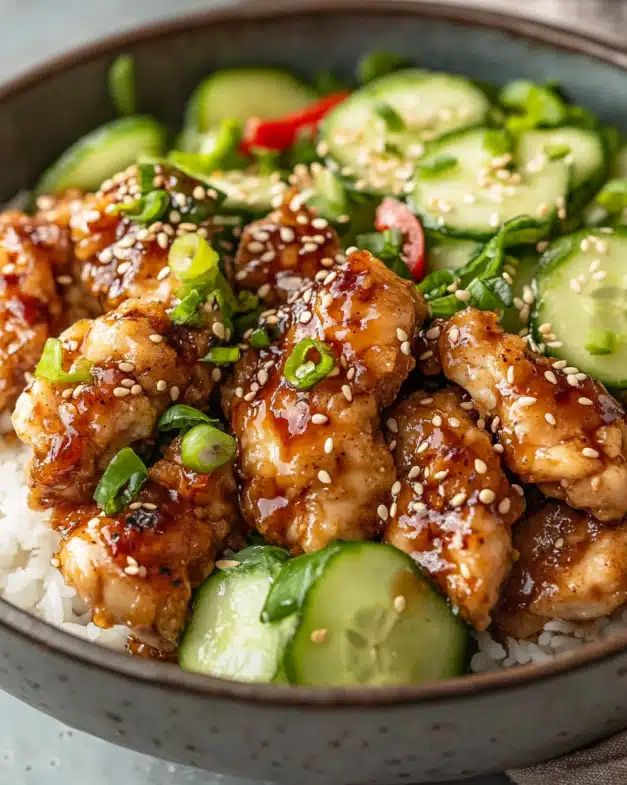
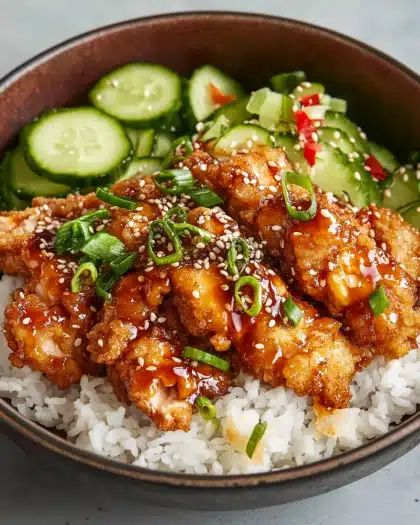
If you have ever craved a meal that balances soul-satisfying comfort with vibrant, high-end flavors, look no further. These Crispy Chicken Karaage Rice Bowls offer more than just a quick dinner; they deliver a multi-layered culinary experience. Imagine bite-sized pieces of golden-brown chicken, tender on the inside and perfectly crisp on the outside, finished with a luscious, slightly sweet miso-honey glaze.
Nestled atop a bed of perfectly seasoned sushi rice and paired with a refreshing, tangy cucumber salad, this dish hits every flavor profile—from sweet and savory to deep umami. Whether you are looking for a reliable weeknight staple or an impressive meal to share with friends, this Japanese-inspired recipe brings gourmet quality straight to your kitchen with ease.
Quick Answer: Chicken Karaage is a traditional Japanese cooking technique where protein is marinated in soy, ginger, and garlic, then coated in starch and fried for a signature crunch. These bowls elevate the classic snack into a full meal by adding a miso glaze, vinegared rice, and a chilled cucumber salad for a balanced, restaurant-quality experience.
Creating a balanced meal that offers incredible texture, deep umami flavor, and ease of preparation is the holy grail of home cooking. These Crispy Chicken Karaage Rice Bowls are specifically designed to hit those high notes while remaining accessible for a weeknight schedule. By combining the crunch of Japanese-style fried chicken with the brightness of a quick-pickled salad and the richness of a miso glaze, you create a dish that is far greater than the sum of its parts.
Why You’ll Love These Chicken Karaage Rice Bowls
There is a reason why karaage is a staple in Japanese bento boxes and izakayas alike. It is reliable, flavorful, and incredibly satisfying. Here is why this specific recipe will become a permanent fixture in your rotation:
- Unbeatable Texture: The combination of a soy-based marinade and a cornstarch-heavy coating creates a “glass-like” crunch that stays crispy longer than traditional flour-based fried chicken.
- Healthier Cooking Methods: While traditional karaage is deep-fried, this recipe optimizes the Air Fryer and Convection Oven to achieve that signature snap without the heavy oil.
- Complex Umami Profile: Between the garlic-ginger marinade and the white miso glaze, every bite is packed with savory depth.
- Perfect for Meal Prep: Because the components are stored separately, this is one of the few “fried” chicken recipes that actually tastes great the next day.
What Exactly Is Japanese Karaage?
Before we pick up a knife, it is helpful to understand the technique. Karaage (pronounced kah-rah-ah-geh) refers to a Japanese cooking technique where various foods—most commonly chicken—are deep-fried in oil. What sets it apart from “Southern Fried Chicken” or “Tempura” is the process of marinating the meat directly and using a specific starch coating.
Karaage vs. Other Fried Styles
To help you understand the unique texture we are aiming for, here is a quick comparison of popular fried chicken styles:
| Style | Main Coating | Primary Flavoring | Texture |
|---|---|---|---|
| Karaage | Potato or Corn Starch | In-meat Marinade (Soy/Ginger) | Light, Crispy, Thin Crust |
| Tempura | Cold Flour/Egg Batter | Dipping Sauce (Tentsuyu) | Airy, Flaky, Delicate |
| American Fried | Seasoned Flour/Buttermilk | In-coating Spices | Thick, Craggy, Crunchy |
Essential Ingredients for the Perfect Bowl
The beauty of this recipe lies in its simplicity. You likely already have many of these staples in your pantry. However, using the right starch and chicken cut is non-negotiable for authentic results.
The Chicken Marinade
We use boneless, skinless chicken thighs. Thigh meat contains more fat than breast meat, which ensures the chicken stays juicy even under the high heat of an air fryer or oven.
| Ingredient | Purpose |
|---|---|
| Soy Sauce | Provides the salt base and deep color. |
| Fresh Ginger | Cuts through the richness and adds a “bright” heat. |
| Sesame Oil | Adds a nutty aroma that perfumes the meat. |
| Cornstarch | The secret to the “shatter-crisp” exterior. |
The Sushi Rice and Refreshments
A rice bowl is only as good as its base. Using short-grain sushi rice is essential because it has the starch content required to hold together and absorb the vinegar seasoning without becoming mushy.
The Masterclass: Step-by-Step Instructions
Follow these steps closely to ensure your chicken is crispy and your rice is restaurant-quality.
Step 1: The Flavor Infusion (Marinating)
In a medium bowl, whisk together your soy sauce, grated garlic, ginger, sesame oil, and white pepper. Add your chicken pieces, ensuring every nook and cranny is covered. Pro Tip: If you have the time, marinate the chicken for at least 4 hours. The salt in the soy sauce acts as a brine, breaking down proteins for a more tender bite.
Step 2: Preparing the Sushi Rice
Rinsing is the most skipped step, but it is the most important. You must rinse the rice in cold water until the water runs clear. This removes excess surface starch that causes rice to become gummy.
- Rinse 3-5 times.
- Let the rice sit in a strainer for 30 minutes to “temper”—this ensures even cooking.
- Cook with a 1:1 ratio of water to rice.
- Once cooked, fold in your seasoned vinegar gently to avoid smashing the grains.
Step 3: The “Double Coating” Technique
To get that signature Karaage look, we use a mix of cornstarch and all-purpose flour. The cornstarch provides the crunch, while the small amount of flour helps the coating adhere to the marinated meat. Toss the chicken in the starch mixture until it looks “shaggy”—those little bits of excess starch will become the extra-crispy bits during cooking.
Step 4: Air Frying for Maximum Crunch
Preheat your air fryer to 400°F (200°C). Arrange the chicken in a single layer. Do not let the pieces touch; air must circulate around each piece to dehydrate the surface and create a crust. Cook for 12–15 minutes, flipping halfway through. If using an oven, use a wire rack to prevent the bottoms from getting soggy.
Step 5: The Miso Glaze and Assembly
The glaze should be glossy and thick enough to coat a spoon. Warm your honey slightly before whisking in the miso and rice vinegar. Toss the hot chicken in the glaze just before serving to maintain the crunch. Layer your bowl starting with a generous base of rice, followed by the glazed chicken, and a side of the chilled cucumber salad.
Expert Tips for Crunchy Perfection
Even seasoned cooks can benefit from these small adjustments that make a massive difference in the final result:
- Dry the Chicken: Before adding the starch, ensure the chicken isn’t swimming in liquid. If there is too much marinade, drain it slightly so the starch forms a paste rather than a soup.
- The Temperature Rule: Serve the chicken immediately. The contrast between the piping hot chicken and the cold cucumber salad is a hallmark of great Japanese bowl construction.
- Miso Matters: Use White Miso (Shiro Miso) for this recipe. It is milder and sweeter than red miso, which can be too salty for a glaze.
Nutrition Breakdown per Serving
This meal is a fantastic balance of protein, carbohydrates, and healthy fats. Using an air fryer significantly reduces the caloric density compared to traditional frying.
| Nutrient | Amount per Serving |
|---|---|
| Calories | 580 kcal |
| Protein | 34g |
| Carbohydrates | 62g |
| Fat | 18g |
| Fiber | 3g |
Frequently Asked Questions (FAQs)
Can I use chicken breast instead of thighs?
Yes, you can, but be careful not to overcook it. Chicken breast dries out significantly faster than thighs. If using breast, reduce the cooking time by 2-3 minutes.
Is this recipe gluten-free?
To make this 100% gluten-free, substitute the soy sauce for Tamari and replace the one tablespoon of all-purpose flour with additional cornstarch or rice flour.
How do I reheat leftovers?
Never use a microwave for fried chicken! To restore the crunch, place the chicken back in the air fryer at 375°F for 4-5 minutes. The rice can be reheated in the microwave with a damp paper towel over it to keep it moist.
By following this guide, you are not just making a meal; you are mastering a technique that bridges the gap between fast food and fine dining. Enjoy your homemade Japanese feast!
You May Also Like
If you enjoyed this recipe, you might find your next favorite meal among our other kitchen-tested guides. Explore more: Japanese-inspired recipes, Air fryer chicken dinner ideas, healthy rice bowls, and miso glaze variations.
To learn more about the history and cultural significance of this cooking style, visit the official entry on Karaage at Wikipedia.

Frequently Asked Questions
What is the best cut of chicken to use for Karaage?
While you can use chicken breast, boneless, skinless chicken thighs are the gold standard for karaage. Thigh meat is more succulent and forgiving, ensuring that your chicken remains juicy even after it has been air-fried or baked at high temperatures.
Can I make these rice bowls gluten-free?
Absolutely! To make this dish gluten-free, simply swap the standard soy sauce for Tamari or a certified gluten-free coconut aminos. Additionally, ensure you are using 100% cornstarch for the coating and omit the tablespoon of all-purpose flour.
How should I store and reheat leftovers?
For the best results, store the crispy chicken, sushi rice, and cucumber salad in separate airtight containers in the refrigerator for up to 3 days. To restore the crunch of the chicken, reheat it in the air fryer at 375°F for 4-5 minutes rather than using a microwave.
Expert Tip: When assembling your bowl for meal prep, keep the miso glaze in a small separate container and drizzle it over the chicken only after you have reheated it to keep the coating as crispy as possible.
Final Thoughts
Bringing the authentic taste of a Japanese izakaya into your own home doesn’t have to be a daunting task. These Crispy Chicken Karaage Rice Bowls prove that with a few pantry staples and the right technique, you can create a restaurant-quality dinner that satisfies both your cravings and your nutritional goals. The balance of the savory marinade, the sweet miso glaze, and the tangy cucumber salad creates a symphony of flavors that is hard to beat.
We hope this recipe becomes a new staple in your household. Don’t forget to customize your bowls with your favorite garnishes—whether that is a squeeze of fresh lemon, a sprinkle of furikake, or an extra dash of chili flakes. Happy cooking, and enjoy every crispy, flavor-packed bite!