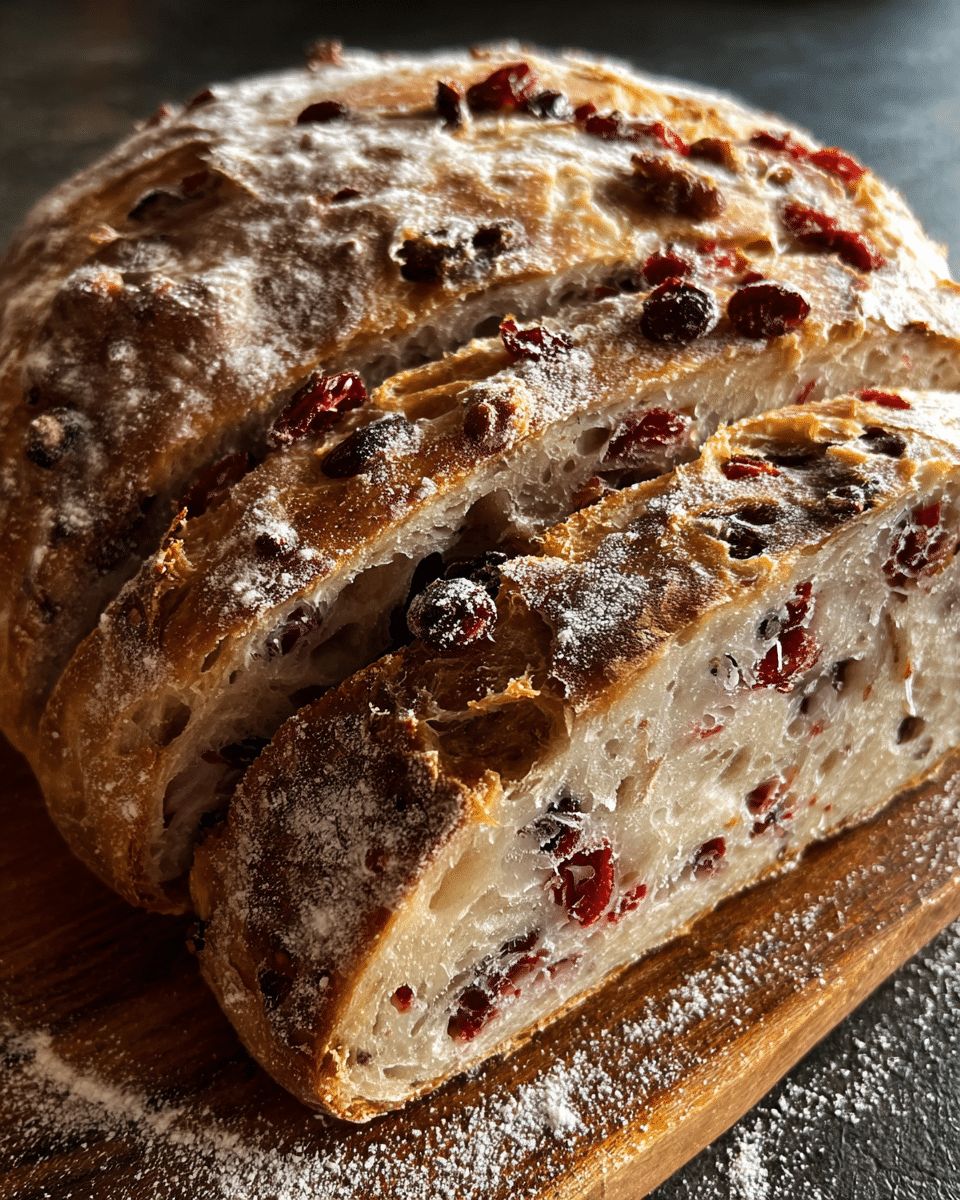
There is nothing quite like the aroma of a freshly baked loaf of Cranberry Raisin Walnut Cinnamon Artisan Bread wafting through the kitchen. This recipe brings together the natural tartness of cranberries, the plump sweetness of raisins, and the earthy crunch of toasted walnuts, all tied together by a gentle whisper of warm cinnamon. It is a bread that looks and tastes like it came from a high-end artisanal bakery, yet it requires surprisingly little effort to master.
The beauty of this loaf lies in its “low-effort, high-reward” nature. By utilizing a no-knead technique and a slow fermentation process, time does the heavy lifting for you, developing a complex flavor and a beautiful, airy crumb structure. Whether you are looking for the perfect centerpiece for a holiday brunch or a cozy companion for your morning coffee, this rustic bread delivers a golden, crackling crust and a soft, flavorful interior every single time.
Quick Answer: This Cranberry Raisin Walnut Cinnamon Artisan Bread is a no-knead, Dutch oven recipe that uses long fermentation to create a rustic, bakery-style crust. It features a perfect balance of sweet dried fruits, crunchy walnuts, and warm cinnamon spice, making it an ideal choice for both sweet and savory pairings.
Essential Ingredients for Your Artisan Loaf
The success of a Cranberry Raisin Walnut Cinnamon Artisan Bread relies on the quality and balance of its ingredients. Because this is a no-knead recipe, we rely on the chemical reactions between high-hydration flour and yeast to create structure. Each component plays a specific role in achieving that perfect rustic finish.
The Core Flour and Hydration Base
To get that signature chewy “artisan” crumb, the type of flour you use matters. While all-purpose flour works for a softer loaf, bread flour is highly recommended due to its higher protein content, which supports the heavy “add-ins” like walnuts and fruit.
- Bread Flour (3 cups): Provides the gluten structure needed for an airy rise.
- Room-Temperature Water (1.5 cups): Essential for activating the yeast without killing it.
- Active Dry Yeast (1 teaspoon): The engine of the bread; ensures a slow, steady fermentation.
- Kosher Salt (1 teaspoon): Tightens the gluten and enhances the overall flavor profile.
Flavor Enhancers and Mix-ins
This is where the bread gains its personality. The combination of tart, sweet, and nutty creates a multi-dimensional tasting experience. Using honey instead of granulated sugar not only provides a softer sweetness but also helps with the browning of the crust.
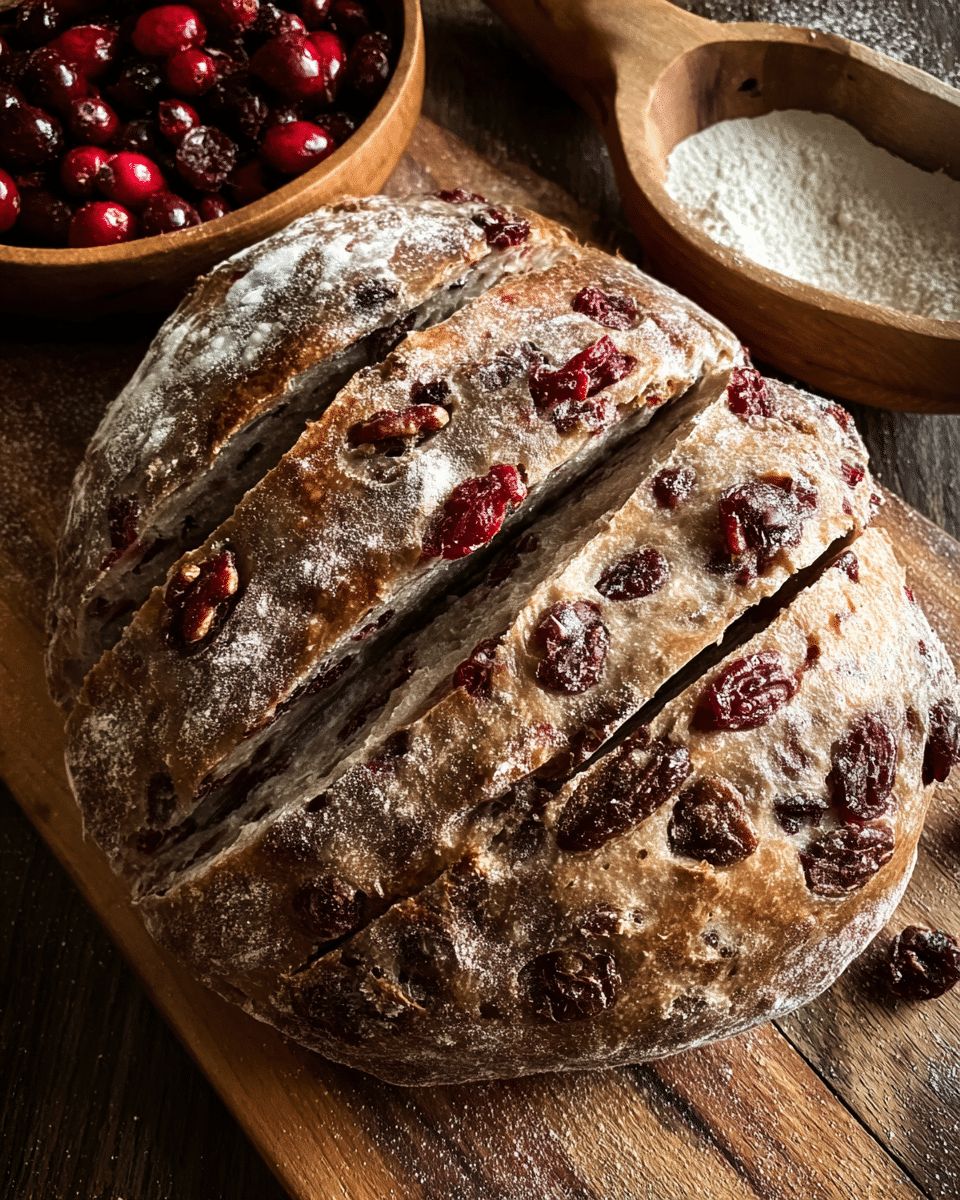
- Dried Cranberries (3/4 cup): Adds a tart pop of flavor that cuts through the richness.
- Raisins (1/2 to 3/4 cup): Provides natural sweetness and chewy pockets of texture.
- Chopped Walnuts (1/2 cup): Offers an earthy crunch and healthy fats.
- Ground Cinnamon (1 teaspoon): Infuses the dough with a warm, comforting aroma.
- Honey (2-3 tablespoons): Feeds the yeast and contributes to a beautiful golden crust.
Recipe Quick Reference and Specs
Before you start mixing, it’s helpful to understand the timeline. No-knead bread is a game of patience rather than physical labor.
| Phase | Duration | Purpose |
|---|---|---|
| Yeast Activation | 5–10 minutes | Ensure yeast is alive and active. |
| First Rise (Bulk) | 8–10 hours | Build flavor and CO2 bubbles. |
| Cold Proof (Fridge) | Overnight | Develop gluten strength and improve scoring. |
| Baking Time | 45–50 minutes | Achieve the perfect golden-brown crust. |
Why the No-Knead Dutch Oven Method Wins
Traditional bread making often scares off beginners because of the “kneading” process. If you don’t knead enough, the bread is flat; if you knead too much, it’s tough. The No-Knead Method removes this variable entirely. Instead of mechanical work, we use time and high hydration to align gluten strands naturally.
The Role of Steam in the Dutch Oven
The secret to that “crackly” crust found in French bakeries is steam. Professional ovens have steam injectors. At home, we use a preheated Dutch oven. By covering the dough during the first half of the bake, we trap the moisture evaporating from the dough itself. This keeps the surface soft, allowing the bread to expand fully (oven spring) before the crust hardens and browns.
Pro Tip: If you don’t have a Dutch oven, you can use a heavy ceramic pot with a tight lid, but ensure it is rated for 450°F (230°C).
Step-by-Step Instructions: From Shaggy Mass to Golden Loaf
Follow these steps precisely to ensure your Cranberry Raisin Walnut Cinnamon Artisan Bread comes out perfectly. Don’t be tempted to rush the fermentation—that is where the magic happens.
1. Activating the Yeast
In a large bowl, stir together your room-temperature water and honey. Sprinkle the active dry yeast over the top and let it sit for about 10 minutes. You are looking for a foamy, “bloomed” appearance. If it doesn’t foam, your yeast may be expired, and you should start over with fresh yeast.
2. Mixing the Dough
Whisk the flour, salt, and cinnamon in a separate bowl. Gradually add the dry ingredients to the yeast mixture. Fold in your cranberries, raisins, and walnuts. Use a heavy spoon to mix until a shaggy dough forms. There should be no dry flour streaks left, but the dough will be very sticky.
3. The Long Fermentation
Cover the bowl tightly with plastic wrap or a damp kitchen towel. Let it sit at room temperature (about 70°F) for 8 to 10 hours. Many bakers find it easiest to mix the dough before bed and let it rise overnight. The dough should double in size and be covered in tiny bubbles.
4. Shaping and Cold Proofing
Gently turn the dough onto a floured surface. Fold it over itself a few times to form a ball. Place the dough into a parchment-lined bowl, cover it, and put it in the refrigerator for at least 2 hours (or overnight). Cold dough is significantly easier to score and holds its shape better in the hot pot.

5. The Bake
- Place your empty Dutch oven into the oven and preheat to 450°F (230°C) for at least 30 minutes.
- Carefully lift the dough (using the parchment paper) and place it into the hot pot.
- Use a sharp knife or razor (bread lame) to score the top. This controls where the bread expands.
- Bake covered for 30 minutes.
- Remove the lid and bake for another 15–20 minutes until the crust is a deep, mahogany brown.
Mastering the “Crumb”: Texture and Flavor Balance
The interior of this bread, known as the “crumb,” should be moist, airy, and studded with fruit. If your bread feels heavy or dense, it likely didn’t rise long enough or the dough was too dry. This is why we emphasize high hydration—sticky dough equals a better crumb!
Managing the Fruit and Nut Distribution
Sometimes heavy ingredients like walnuts sink to the bottom. To prevent this, ensure your dough has enough strength from the long fermentation. You can also lightly toss your dried fruit in a teaspoon of flour before adding them to the mix; this helps them “grip” the dough during the rise.
Storage and Slicing Tips
As tempting as it is, do not slice the bread while it is hot. The interior is still finishing its “cook” via residual steam. If you cut it too early, the crumb can become gummy. Wait at least one hour.
- Room Temperature: Store in a paper bag for 2 days to maintain crust crispness.
- Freezing: Slice the loaf first, then freeze in a freezer-safe bag. Toast individual slices directly from the freezer!
Serving Suggestions for Every Occasion
This bread is incredibly versatile. Its sweet-and-savory profile allows it to shift roles depending on what you serve it with. Because of the cinnamon and fruit, it naturally leans toward breakfast, but don’t overlook its potential as a side for dinner.
The Perfect Breakfast
Toast a thick slice and spread with salted butter or whipped cream cheese. The saltiness of the butter perfectly complements the sweet raisins and tart cranberries. For an extra treat, drizzle a bit of local honey over the top.
Savory Dinner Pairings
Believe it or not, this bread pairs beautifully with roasted meats. Try serving it alongside a slow-roasted pork loin or a savory lamb stew. The fruit in the bread acts much like a chutney or compote would, balancing the richness of the meat.
Holiday Idea: Use leftovers of this bread (if there are any!) to make the most incredible French Toast or Bread Pudding you have ever tasted. The walnuts and cinnamon are already built-in!

You May Also Like
Explore more delicious recipes and baking guides: no-knead bread recipes, holiday baking ideas, breakfast bread favorites, and Dutch oven cooking tips.
Source: Learn more about the history and science of No-knead bread at Wikipedia.
Frequently Asked Questions
Can I use all-purpose flour instead of bread flour?
Yes, you can use all-purpose flour. While bread flour provides a slightly chewier texture and better support for the heavy fruit and nuts, all-purpose flour will still result in a delicious, rustic loaf with a slightly softer crumb.
What if my dough doesn’t rise after 10 hours?
If the dough hasn’t doubled in size, it is likely due to inactive yeast or a very cold kitchen environment. Ensure your yeast is fresh and try moving the bowl to a warmer spot, such as inside an oven with the light turned on (but the heat off).
How do I get a crispier crust on my artisan bread?
The secret is the Dutch oven lid. Removing the lid for the final 15–20 minutes of baking allows the moisture to escape and the dry heat to caramelize the sugars in the crust, resulting in a deep golden color and a satisfying crackle.
Final Thoughts
Mastering the Cranberry Raisin Walnut Cinnamon Artisan Bread is a journey in patience that pays off with every golden, crunchy bite. By allowing time to do the hard work of kneading, you unlock a depth of flavor and texture that is hard to find in store-bought loaves. It is a versatile addition to your baking repertoire, perfect for impressive holiday spreads or a simple, comforting weekday breakfast.
We hope this guide inspires you to fire up your oven and enjoy the rewarding experience of home baking. The combination of warm spice, toasted nuts, and sweet fruit makes this loaf a true family favorite. Happy baking!