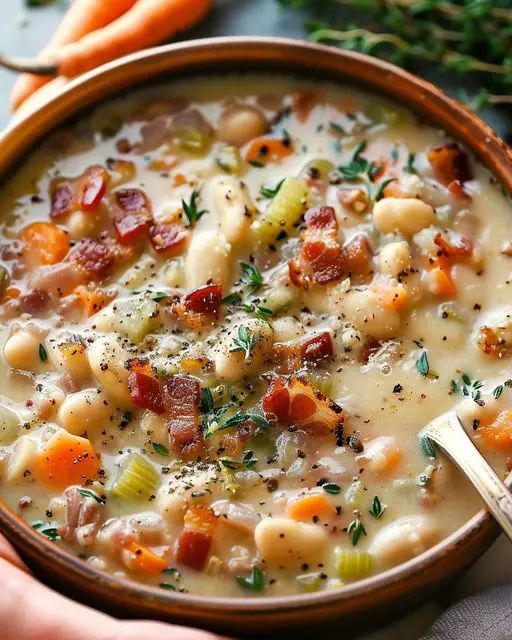
When the temperature drops and the evenings grow shorter, there is nothing quite as restorative as a bowl of Creamy Bacon and White Bean Soup. This recipe is the ultimate comfort food, striking a perfect balance between the smoky, salty crunch of crispy bacon and the smooth, buttery texture of cannellini beans. Enriched with a hint of heavy cream and the savory depth of a Parmesan rind, it is a restaurant-quality meal that you can easily whip up in your own kitchen.
What makes this soup a standout is its incredible depth of flavor. By sautéing aromatic shallots, carrots, and celery directly in the rendered bacon fat, every spoonful is infused with a rich, savory essence. Whether you are looking for a quick weeknight dinner that the whole family will love or a sophisticated starter for your next dinner party, this versatile dish delivers warmth and satisfaction in every bite.
Quick Answer: This Creamy Bacon and White Bean Soup is a hearty, one-pot meal featuring smoky bacon, tender cannellini beans, and aromatic vegetables simmered in a velvety, Parmesan-infused broth. It takes approximately 45 minutes to prepare and is perfect for freezing or meal prepping.
Mastering the Perfect Creamy Bacon and White Bean Soup
Creating a truly exceptional Creamy Bacon and White Bean Soup is an exercise in layering flavors. While many soups rely on heavy cream for their texture, this recipe utilizes the natural starch of cannellini beans and the umami-rich addition of a Parmesan cheese rind to build a base that is both light and luxuriously thick. This soup isn’t just a meal; it’s a cold-weather survival strategy that brings gourmet flair to your dining table.

Key Ingredients for Success
To ensure your soup has the best possible profile, pay close attention to the quality of these core components:
- Bacon: Use thick-cut bacon if possible. It yields more fat for sautéing and maintains a better “bite” after being added back to the liquid.
- Cannellini Beans: These are preferred over Great Northern or Navy beans for their creamy interior and thinner skins.
- Aromatics: The combination of shallots, carrots, and celery (the classic mirepoix) provides a subtle sweetness that balances the saltiness of the bacon.
- White Wine: A dry wine like Sauvignon Blanc or Pinot Grigio is best for deglazing. The acidity cuts through the fat of the bacon and cream.
Step-by-Step Cooking Guide
Following a specific order of operations ensures that every ingredient is cooked to its optimal texture. Here is the breakdown of how to execute this masterpiece.
1. Rendering the Bacon and Building the Base
The first step is arguably the most important. You must properly render the fat from the 10 strips of diced bacon. Start in a cold pot to allow the fat to melt slowly, resulting in perfectly even, crispy bits. Once removed, that golden bacon grease becomes the flavorful oil in which your vegetables will caramelize.
When you add the shallots, carrots, and celery, you are looking for them to become translucent and slightly soft. This usually takes about 3 minutes over medium-high heat. Don’t rush the garlic; it only needs about 60 seconds to release its oils without burning and turning bitter.
2. The Magic of Deglazing
After the vegetables are aromatic, pour in the half-cup of white wine. Use a wooden spoon to scrape the bottom of the pot. These “brown bits” (known as the fond) contain concentrated flavor that elevates the broth from basic to brilliant. Let the wine reduce until the harsh alcohol scent is replaced by a sweet, concentrated aroma.
3. Simmering to Perfection
Adding the chicken stock and undrained cannellini beans brings the volume to the soup. The liquid inside the bean cans is rich in starch, which helps naturally thicken the broth. Dropping in the fresh rosemary and bay leaf at this stage allows the herbs to steep like tea.
Pro Tip: Never throw away your Parmesan rinds! Tossing one into the simmering liquid adds a salty, nutty depth that salt alone cannot replicate. It’s the “secret ingredient” that makes people ask for the recipe.
Recipe Specifications and Nutritional Overview
To help you plan your meal, here is a breakdown of the timing and estimated nutritional data per serving.
| Category | Details / Values |
|---|---|
| Prep Time | 15 Minutes |
| Cook Time | 30 Minutes |
| Total Time | 45 Minutes |
| Servings | 4 – 6 People |
| Calories per Serving | ~380 kcal |
| Protein | 18g |
Customizing Your Soup: Variations and Swaps
This recipe is highly adaptable. Depending on your dietary needs or what you have in the pantry, you can easily modify the ingredients without losing the soul of the dish.
Dietary Adjustments
- Vegetarian Version: Substitute the bacon with smoked paprika and a tablespoon of butter or olive oil. Use vegetable broth instead of chicken stock.
- Dairy-Free: Omit the Parmesan and heavy cream. Instead, blend two full cans of beans with a little broth before adding them to the pot to achieve that signature creaminess.
- Extra Greens: Stir in two cups of baby spinach or chopped kale during the final 2 minutes of cooking. The heat of the soup will wilt them perfectly.

Essential Kitchen Tools
While you don’t need fancy gadgets to make a great soup, these tools will make the process much smoother:
- A Heavy-Bottomed Pot: A Dutch oven or heavy stainless steel pot prevents the bacon fat from burning and distributes heat evenly.
- Slotted Spoon: Essential for removing the crispy bacon while leaving the precious fat behind.
- Immersion Blender: If you prefer a thicker, chowder-like consistency, a quick 5-second pulse with an immersion blender will thicken the soup instantly.
- Microplane: Perfect for grating fresh Parmesan cheese over the top just before serving.
Storage and Reheating Instructions
This soup is arguably even better the next day as the rosemary and garlic flavors continue to develop in the fridge.
Refrigeration: Place in an airtight container for up to 3 days. Because the beans continue to absorb liquid, you may need to add a splash of water or broth when reheating.
Freezing: This soup freezes beautifully for up to 3 months. However, if you know you are going to freeze it, consider leaving the heavy cream out and adding it fresh when you reheat the soup after thawing. This prevents the dairy from separating during the freezing process.
A Note on Reheating: Always reheat cream-based soups over low to medium heat. Bringing them to a violent boil can cause the cream to “break,” resulting in a grainy texture.
You May Also Like
If you enjoyed this comforting bowl, you might also love exploring these related flavors: hearty stews, savory bacon dishes, quick 30-minute soups, and mediterranean bean recipes.
To learn more about the nutritional benefits and history of these versatile legumes, check out the guide on Common Beans via Wikipedia.
Frequently Asked Questions
Can I make this soup in a slow cooker or Crock-Pot?
Yes! To adapt this for a slow cooker, first crisp the bacon and sauté the vegetables on the stove to develop flavor. Transfer everything (except the cream, parsley, and grated Parmesan) to the slow cooker and cook on low for 6–8 hours or high for 3–4 hours. Stir in the dairy and garnishes just before serving.
What can I use as a substitute for white wine?
If you prefer not to use alcohol, you can substitute the white wine with an equal amount of chicken stock mixed with a teaspoon of lemon juice or apple cider vinegar. This provides the necessary acidity to balance the richness of the bacon and cream.
Why should I use the bean liquid instead of rinsing them?
The liquid in canned cannellini beans is full of natural starches released during the canning process. Adding this liquid to your Creamy Bacon and White Bean Soup acts as a natural thickener, giving the broth a silkier body without needing to add extra flour or cornstarch.
Final Thoughts
This Creamy Bacon and White Bean Soup is more than just a quick weeknight dinner; it is a bowl of pure nostalgia and warmth. By combining simple pantry staples like canned beans with high-impact ingredients like smoky bacon and Parmesan rinds, you create a complex flavor profile that tastes like it has been simmering all day long.
Whether you serve it in a bread bowl or alongside a simple green salad, this recipe is sure to become a recurring favorite in your household. Don’t forget to experiment with the texture—blending just a small portion can turn a rustic broth into a luxuriously thick chowder. Happy cooking!