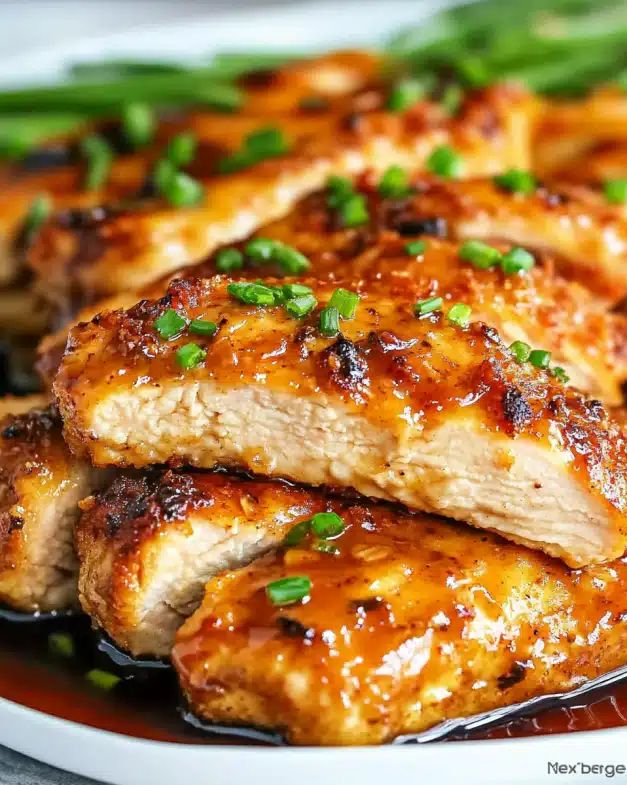
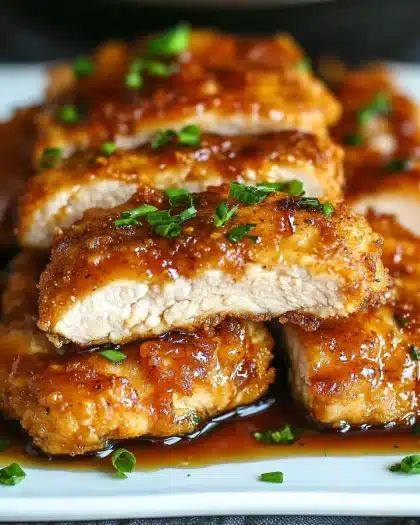
The Ultimate Flavor-Packed Comfort Food: Crispy Honey Garlic Chicken
There is something incredibly satisfying about biting into a piece of crispy chicken that has been perfectly seasoned and coated in a sticky, sweet-savory glaze. If you have ever found yourself craving comfort food that feels both indulgent and gourmet, you are about to discover a recipe that checks every box. This Crispy Honey Garlic Chicken with Spices brings together a mouthwatering blend of aromatic herbs and spices, finished with a luscious honey garlic sauce that is simply irresistible.
Whether you are cooking a weeknight family dinner or prepping a crowd-pleaser for guests, this recipe is designed for versatility. You can deep-fry your chicken for that authentic golden crunch or opt for an oven-baked version for a lighter, healthier alternative. By mastering the spiced flour dredge and the delicate balance of the honey-soy glaze, you can bring restaurant-quality flavors directly to your kitchen table.
Quick Answer: The secret to the ultimate Crispy Honey Garlic Chicken lies in a triple-step coating process (flour, egg wash, flour) combined with a spiced dredge featuring ginger, nutmeg, and paprika. This creates a textured crust that perfectly captures the simmered honey and garlic glaze.
Why You’ll Love This Crispy Honey Garlic Chicken Recipe
If you are tired of bland chicken or soggy coatings, this recipe is a game-changer. It strikes a rare balance between a sophisticated spice profile and the comforting, sticky sweetness of a classic honey garlic glaze. The result is a dish that feels like a high-end restaurant entree but is achieved with simple pantry staples.
The versatility of this dish also makes it a standout. You can serve it as a main course with grains, toss it into a fresh salad for a protein boost, or even serve smaller pieces as an appetizer. Here are a few more reasons this will become your new favorite:
- Unmatched Texture: The double-dredge technique ensures a thick, craggy crust that holds onto the sauce without losing its crunch.
- Complex Flavor: Unlike standard recipes that rely solely on salt, our spiced flour mix uses ginger, nutmeg, and sage for a warm, earthy depth.
- Method Flexibility: Whether you prefer the golden results of shallow frying or the convenience of oven-baking, we have perfected both paths for you.
- Family Approved: The sweet glaze is a hit with kids, while the subtle aromatic spices satisfy more adult palates.

Essential Ingredients for Success
To achieve the perfect Crispy Honey Garlic Chicken, the quality of your ingredients and the precision of your measurements are key. We have divided the requirements into two main components: the savory chicken coating and the signature honey-soy glaze.
The Chicken and Spiced Coating
The chicken breast provides a lean, juicy canvas, but the real star is the seasoned flour. This isn’t just a basic breading; it’s a carefully curated blend of nine different spices and herbs designed to complement the honey sauce.
| Ingredient | Quantity | Role in Recipe |
|---|---|---|
| Boneless Skinless Chicken Breasts | 4 Large | Main Protein |
| All-Purpose Flour | 2 Cups | Base for the Crust |
| Ground Ginger & Nutmeg | 3 tbsp & 1 tbsp | Adds Warmth and Aroma |
| Thyme & Sage | 2 tsp each | Provides Earthy Herbaceousness |
| Paprika & Cayenne | 2 tbsp & 1 tsp | Color and Subtle Heat |
| Eggs & Water | 4 Eggs + 8 tbsp | The “Binder” (Egg Wash) |
The Honey Garlic Glaze
This sauce is what ties the whole dish together. By using low-sodium soy sauce, we control the saltiness, allowing the natural sweetness of the honey and the pungency of the fresh garlic to shine through.
- Honey (1 Cup): Provides the sticky texture and sweetness.
- Low-Sodium Soy Sauce (1/4 Cup): Adds umami and a dark, rich color.
- Fresh Garlic (3-4 Cloves): Must be minced finely for maximum flavor infusion.
- Black Pepper (1 tsp): Adds a final bite to cut through the sugar.
Step-by-Step Instructions: The Frying Method
Frying gives the chicken a traditional “soul food” crunch. To avoid a greasy finish, follow these specific steps to ensure your oil remains at the perfect temperature throughout the process.
1. Prepare and Tenderize
Uniformity is the secret to even cooking. Place your chicken breasts between plastic wrap and use a meat mallet to pound them to a consistent 1/2-inch thickness. This prevents the outside from burning while waiting for a thick center to cook through.
2. The Double-Dredge Technique
This is the most critical part of the recipe. A single coat of flour is often too thin to stand up to a thick honey sauce. Follow this order:
- First Dredge: Lightly coat the seasoned chicken in the spiced flour. Shake off the excess.
- The Bath: Submerge the chicken completely in the egg and water mixture.
- Final Coat: Return the chicken to the flour bowl. This time, press the flour firmly into the meat to create those craggy bits that turn extra crispy when fried.
3. Mastering the Skillet
Heat your canola oil over medium heat. You want about half an inch of oil—enough to submerge the bottom half of the chicken. When the oil is ready, it should sizzle immediately when a pinch of flour is dropped in. Cook for 4-5 minutes per side. Pro Tip: Never crowd the pan. Cooking too many pieces at once drops the oil temperature, leading to soggy chicken.
Oven-Baked Alternative: Maximum Crunch, Less Oil
If you prefer to skip the stovetop frying, the oven-baked version is a fantastic, healthier alternative. The trick to getting “oven-fried” results is using a preheated baking sheet.
The Secret to Oven Crispiniss
By placing your baking sheet in the oven while it preheats to 425°F, you create an immediate searing surface. When you place the chicken on the hot, oiled metal, the bottom begins to “fry” instantly.
- Prep: Use the same double-dredge method as the fried version.
- Oil Spray: Once the chicken is on the tray, lightly spray the tops with a neutral vegetable oil. This helps the flour hydrate and brown into a crust rather than staying powdery.
- Timing: Bake for 15 minutes, flip carefully, and bake for another 10-15 minutes.
Simmering the Perfect Sauce
While your chicken rests on a wire rack, it’s time to finish the glaze. The goal is a sauce that is thick enough to coat a spoon but fluid enough to dip into.
Infusing the Aromatics
Sauté the minced garlic in olive oil just until fragrant—usually about 30 to 60 seconds. Do not let it brown, as garlic becomes bitter when overcooked. Once fragrant, whisk in the honey and soy sauce. Let it simmer for 5-10 minutes on low heat. As the water content in the soy sauce evaporates, the sugars in the honey will concentrate, creating a glossy, professional-grade glaze.
Expert Tips and Storage Advice
To ensure this recipe turns out perfectly every single time, keep these expert styling and cooking tips in mind:
Chef’s Secret: Always rest your fried chicken on a wire rack rather than paper towels. Paper towels trap steam under the chicken, which softens the bottom crust. A wire rack allows air to circulate, keeping it crispy on all sides.
- Make-Ahead Dredge: You can double or triple the spiced flour mixture and store the extra in a sealed container in your freezer. It stays fresh for up to 3 months!
- Sauce Consistency: If your sauce gets too thick as it cools, simply whisk in a teaspoon of warm water to loosen it up before serving.
- Leftovers: If you have leftovers, the best way to reheat them is in an Air Fryer at 350°F for 3-4 minutes. This restores the crunch better than any microwave ever could.
Nutritional Breakdown per Serving
| Category | Value (Approx.) |
|---|---|
| Total Calories | 550 kcal |
| Protein | 42g |
| Carbohydrates | 65g |
| Prep Time | 15 Minutes |
| Cook Time | 20-30 Minutes |
You May Also Like
If you enjoyed this recipe, explore more flavor-packed ideas on our blog: Easy Chicken Breast Recipes, Homemade Comfort Food, Quick Dinner Ideas, and Sweet and Savory Glazes.
For more information on the history and variations of this popular sauce profile, check out: Honey Garlic Sauce on Wikipedia
Frequently Asked Questions
Can I make this recipe gluten-free?
Yes, you can easily adapt this dish for a gluten-free diet. Simply substitute the all-purpose flour with a gluten-free 1-to-1 baking blend and ensure your soy sauce is replaced with tamari or a certified gluten-free alternative. The double-coating method still works beautifully to provide a satisfying crunch.
How do I prevent the garlic in the sauce from tasting bitter?
The secret is to sauté the minced garlic over medium-low heat only until it becomes fragrant. Avoid letting the garlic turn dark brown or black, as burnt garlic quickly develops a sharp, bitter flavor that will overpower the sweetness of the honey. Once you smell the aroma, immediately add the honey and soy sauce to stop the browning process.
What is the best way to reheat leftovers while keeping them crispy?
To restore the original texture, avoid the microwave, which can make the coating soggy. Instead, use an Air Fryer at 350°F (175°C) for 3–5 minutes or a conventional oven at 375°F (190°C) until heated through. This helps the honey garlic glaze caramelize again while crisping up the spiced crust.

Final Thoughts
Mastering this Crispy Honey Garlic Chicken with Spices is a surefire way to upgrade your weeknight dinner rotation. By combining a deeply aromatic spiced flour dredge with a glossy, simmered glaze, you create a dish that balances textures and flavors perfectly. Whether you choose to fry for maximum indulgence or bake for a lighter alternative, the result is a gourmet comfort food experience that your family will request again and again.
Don’t be afraid to experiment with the spice levels in the coating or the thickness of the sauce to suit your personal preference. This recipe is designed to be a versatile foundation for your culinary creativity. Gather your ingredients, follow the steps, and enjoy the most satisfying, flavor-packed chicken you’ve ever made at home!